
PLANNING
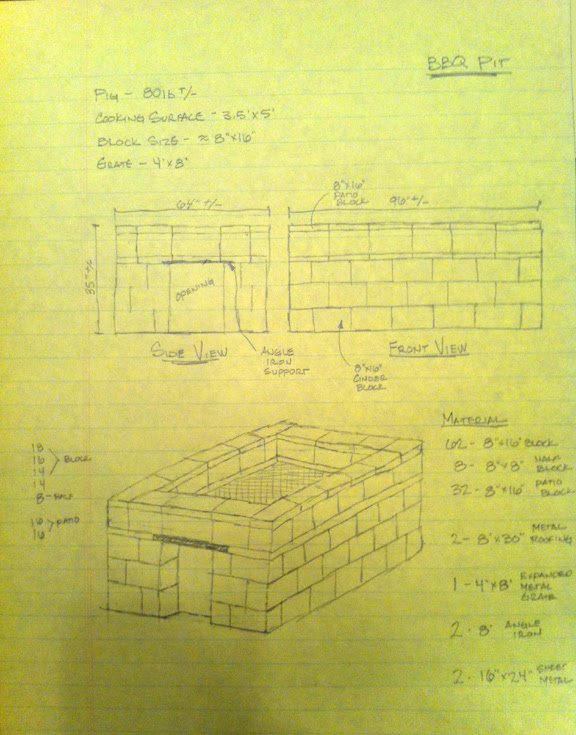
First, sit down and decide how large you actually needed your pit to be. I was roasting a pig and needed something a little larger. After some further research it was decided a surface of at least 3.5' x 5' would be needed to roast a whole pig. Although, I wanted a little more room around the pig for smoke circulation, and didn't want to feel crowded while tending to the pig, so I decided to make it a little larger. I, then, sketched out my idea to try to get a visual idea of how I wanted it to look and also to plan for a materials list. My final barbecue pit size ended up being about 5' x 8' outside dimensions with a cooking surface that is about 4' x 6'-8".
Did I overcompensate? You bet I did! However, I did have a method for my madness.
 |
| Pit Sketch |
After planning approximately how large you want your pit, decide how far off the ground you want your cooking surface. I decided to place mine 3 blocks high or about 22"-24" off the ground. Some people may say that is too far off the ground, and will only put theirs 12”-16" off the ground. However, I took a couple things into consideration for myself. First, and foremost, I didn't want to have to be leaning that far over to tend to my food that was cooking. Second, I was going to be cooking with indirect heat and did not need a super hot flame. I was barbecuing and going to be using the low and slow ideology.
Next, you need to consider where you are going to place the openings in your pit to add coals for cooking. If it is a larger pit you are going to want openings on either end. This serves a two-fold purpose. First, you need heat on each end to create a cooking surface with evenly distributed heat. Second, having two opening on opposite ends will help with your temperature as you can now control air flow.
Materials List
This is a materials list for the pit I built. Adjust your list based upon the size you are planning to build.
62 - 8" x 16" cinder block
8 - 8" x 8" half cinder block
32 - 8" x 16" patio block
2 - 8' x 30" corrugated metal roofing sheets
1 - 4' x 8' 9GA expanded metal grating
2 - 8' long angle iron bars
2 - 16" x 24" sheet metal
Explanation of Materials Needed
Cinder Block - These are the building blocks, literally, of your pit. I dry stacked my blocks on a level surface. They don't need to be mortared together unless you want to create a permanent cooking feature in your back yard.
Half Blocks - I wanted my pit to look nice and uniform and not have any rough edges. I purchased 8" x 8" x 8" half blocks, or half sash, to accommodate my design.
Patio Block - Although these are not necessary for you to build your pit I wanted to accent it with a different color. I purchased 8" x 16" red patio blocks to add some color and to give a little extra height between the pig and the cover, once again to create room for smoke circulation.
Metal Roofing - The corrugated metal roofing is used to cover the pit while cooking. Most stores that carry this are going to have galvanized roofing. You would not want to cook on galvanized material as it can release toxins into your food. However, as a cover it will work perfectly fine without any danger of contaminating your food. Your pit will not get hot enough for this to happen.
Expanded Metal Grate - This is the same material you might see on landscape trailer or metal storage bins. This can be used as a cooking surface. The lower the gauge you purchase the thicker and stronger the material is going to be. I purchased 9 gauge. However, 13 gauge is half the price and will work just as well, as you are going to need supports underneath the grate anyway, for a cooking surface as large as mine.
The method to my madness, as stated earlier, was based upon building my pit around my cooking surface. By purchasing a singe 4' x 8' piece of expanded metal grating I could have a cooking surface that would be large enough for a pig, without having to pay the extra cost to have multiple smaller sheets, or have the larger sheet cut down.
Angle Iron - This is going to be used as your block supports to create your openings for your charcoal. They will also be used as supports for your cooking surface. A flat piece of metal bar stock will not work as it does not have the support strength, and will begin to flex. I happened to have a couple pieces of 8 foot long garage door support beams that I cut up and used for my support pieces. They worked perfect and are cheaper than buying pieces of real angle iron.
Sheet Metal - HVAC department at Home Depot or Lowes. It is much cheaper than buying the individual pieces of stock metal.
You could also simply use additional stacked block at each opening. However, there will just be a little more work involved each time you would like to add charcoal, or control temperature.
Where to Purchase and Cost
Most of this material can be purchased at either Home Depot or Lowes. I found that Lowes was less expensive than Home Depot, and contained a better selection of materials for this application.
Cinder Blocks - Home Depot sells these blocks for $1.00 a piece and the 8” x 8” x 16” corner sash pieces separately for $1.10 each. Lowes, however, includes both types of block together on their pallets, and sells them all for $1.00 each.
Half Block - Both Home Depot and Lowes sell these for $1.10 each.
Patio Block - I got my patio blocks at Home Depot for $1.00 each. Lowes, in my area, only carried the thicker 2" patio blocks and I didn't want them to sit that high.
Metal Roofing - Lowes was the only place that carried this material. It had to be ordered from Home Depot. A single 30" x 8' sheet was $17.
Sheet Metal - Both Home Depot and Lowes carry this product. Look in the HVAC department and there are various sizes you can choose from. I purchased two 16" x 30" sheets at $6 each from Home Depot. This was way cheaper than the $15 each Home Depot wanted for their 12" x 24" stock sheet metal.
Expanded Metal Grating - This was the only material I had to do some searching around for. I found a supplier that sold this for $80 per sheet for 9 gauge. As mentioned earlier you could use 13 gauge priced at $40. However, if you plan on keeping your pit around for a while, try to find a place that has stainless steel grating. A sheet that large will cost about $200 but it might be worth it as it won't rust like the other expanded metal sheets.
Total Cost - You can build a pit as large as this one for under $250, and after doing so you will be the envy of your friends.
BUILDING
Alright, calm down! We are finally at the good stuff. So how do you build this thing now that you have a bunch of material sitting in your back yard? Very simply! It takes anywhere from 30-60 minutes to build your pit, depending on how many breaks you take to get another beer.
Laying Block - Make sure you are on a level surface. If you are not than all your block is going to be crooked, which in turn means your pit is going to be less stable. If you are placing it on a grass surface I would recommend cutting out the sod first. Burning grass will not produce a good smoke flavor you want in your food. Also, I would not recommend putting this on your asphalt, or concrete driveway. The heat will melt your asphalt and the charcoal will stain your concrete drive. In addition, your concrete drive could explode. Yes I'm serious, your driveway could explode. You’re going to have to stick around as I will explain that in a later posting.
Start laying your block and create one continuous row including where your openings will be. Make sure it is square on all sides. If you purchased the half block corner sashes keep in mind that one will be placed on either side of the block that is in place of your future opening.
Next, lay your second row using full size block and using the sash units at your corners. You don't have to place a block at your planned opening. The first block laid is simply a guide and will/can be removed.
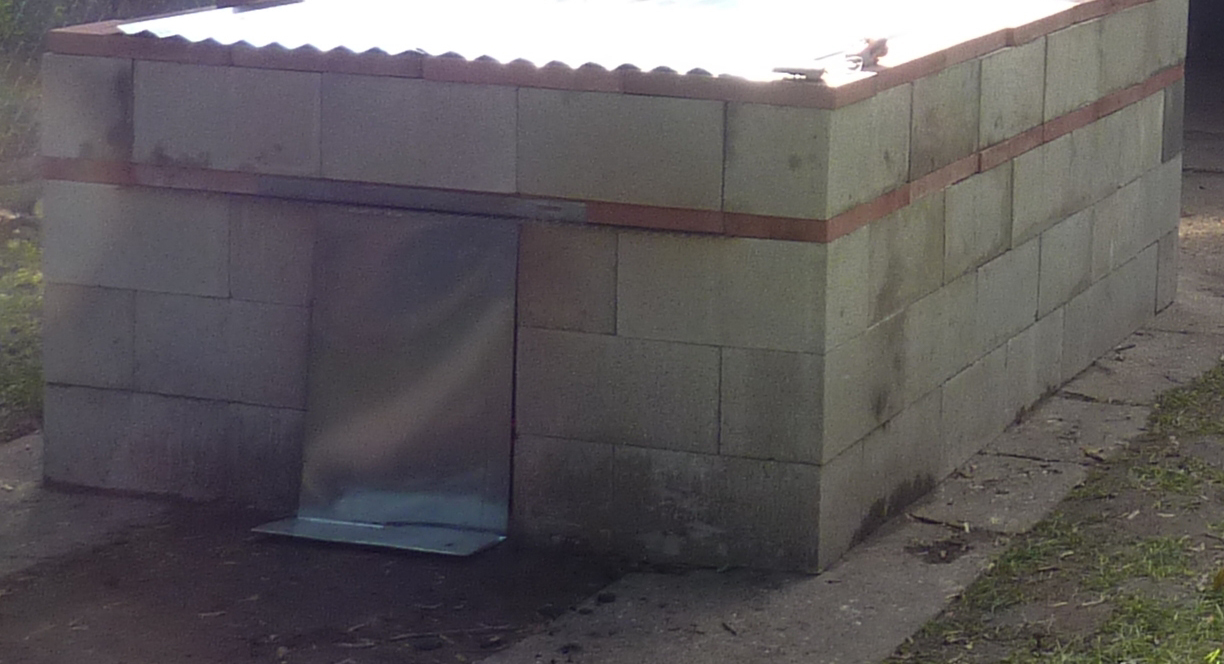
The third row will be laid the same as the first, including the half blocks. It should look similar to the pictures below.


After laying the first three rows you are going to be ready to place your grate on top. However, as you will notice in the previous pictures you need to place your angle iron support in place for your grate.
Measure and cut two supports the width of your pit and put into place. These will be placed to look like an upside down "L" with the down part fitting between the sides of your cinder block. Now place your grate on top. Across the width it will rest on your block about an inch on each side. You will notice that the grate will extend past the blocks on each end length-wise about 1" to 1 1/2". This is because you purchased a full 8 foot long sheet and the six blocks you laid isn’t 8 feet long because your cinder blocks aren't really 16" wide. This dimension is only achieved after placing the mortar between the blocks. Of course you could always have it cut down if you like.
Once the grate is down you are going to need to cut four more supports about 6" larger than the openings at each end. These are going to be placed above your opening, on top of the grate, at the front and backside of the block below, at each end, looking like two upright "L's" facing each other.
Now you are ready to start stacking block again. However, if you purchased the patio blocks this is where the first row is laid continuously all the way around. On top of the patio blocks is one more row of cinder block laid continuously, keeping in mind your corner sashes, and a final row of patio block.


Now you have a well constructed barbecue pit that looks good, to boot!
As an afterthought, I decided to put 1/4 yard of crushed limestone in the bottom of my pit. This was more of an aesthetic feature than functional. If you are placing your pit on a grass surface this could prove functional as you wouldn’t have to take out your sod first. If you decide to do this it will be easier to do before stacking too many blocks.


Now there are only two things left to do. First place the metal roofing sheets on the top in such a way that one will overlap the other. Having two sheets is beneficial when you want to check on, or tend to, your food without moving a larger sheet and losing too much heat. Second put your sheet metal into place at your openings. If you purchased a larger sheet you can cut it with metal shears, or bend it to stand in place.

FINISHING TOUCHES
After the metal roof sheets were in place I drilled a couple of holes at each end and dropped in a deep fry thermometer to watch the internal temperature of the pit.

Also, you may want to place some extra brick around the edges of the metal roofing, especially if it is windy, and to help keep heat from escaping.

Now you are ready to start cooking. Add some charcoal and put your pit to work.

Fire up! Happy Barbecuing!
If you have any questions about how to build a BBQ pit please feel free to contact me at CaughtSmokinBBQ@gmail.com.